
Guide for YouTube HDR delivery
Written by Julian Pössnicker on April 2021
In past years I had a few projects incorporating the Academy Color Encoding System (ACES) workflow. Check out my blog post about remastering a project with ACES: HDR Remastering with the Academy Color Encoding System. One of the big advantages of working with the ACES color pipeline is the possibility to export to many different formats such as HDR formats like PQ (ST2084) and bt.2020 color gamut. This is cool but I did not know any way to upload HDR videos to YouTube. After my research, I figured out a possible workflow. In the following part, I am going to describe a possible workflow for uploading HDR videos to YouTube. When your video is properly rendered in HDR you can jump straight to chapter 3. If you are interested, check out my follow-up post about AV1 encoding for YouTube HDR videos: HDR | YouTube AV1 upload
If you are interested in rendering HDR cinematic videos in Unreal Engine 5, check out: Unreal Engine 5 Part 1 | Color Management and ACES Integration
1. HDR-Standards
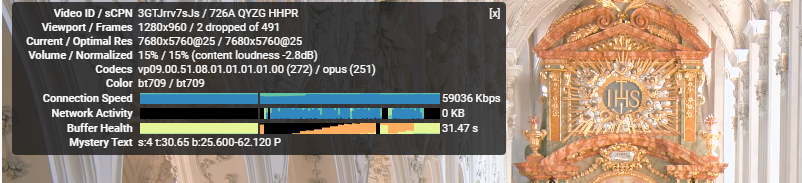
YouTube is an online video platform that accepts both SDR and HDR content. SDR stands for standard dynamic range. The most common SDR standard is the BT.709 standard which is used for most videos on the web. HDR stands for high dynamic range and common HDR standards is HLG (Hybrid Log-Gamma) which is used for HDR live broadcasting and can be directly recorded by a few cameras. Another common HDR standard is SMPTE ST-2084 Perceptual Quantizer (PQ) with BT.2020 colors. Both standards are supported by YouTube, but they function a bit differently. So, it is especially important to know which standard you are working in.
For example, in DaVinci Resolve`s Color Management Settings, you can choose the desired output format. As you can see in the following picture, when you are working with ACES you can choose many “Output Device Transforms”. Such outputs can be also set with the DaVinci Color Management.
![]()
For YouTube, the HDR formats Rec.2020 ST2084 and Rec.2020 HLG are suitable for HDR delivery.
2. YouTube Meta
When the video is rendered in a Quicktime format such as DNX-HR in DaVinci Resolve the needed metadata is available. But the file sizes can be too big for upload and the metadata can be lost or changed when you render or convert your video with Adobe`s media encoder. The metadata tells YouTube in which format the video is mastered. When the metadata is wrong, the video will probably look wrong. So, a way to convert to a YouTube-friendly and compressed format that saves the correct metadata is needed.
3. YouTube Format Conversion
YouTube uses the so-called vp9 codec for 4K video. Vp9 encoded videos can be uploaded and displayed with 10bits per color channel on YouTube which is very important for HDR video. Also, the codec is much smaller than other 10bit codecs such as ProRes 422 or DNX-HR. Sadly, that vp9 is not an option in the render settings in DaVinci Resolve or the Media Encoder.
But there is always a way.
The FFmpeg converter can convert to vp9. It is not a conventional UI-converter such as the Media Encoder, but it is more powerful. Using it is not that difficult, but on the first try, it is very unconventional to use. Because of that, I describe the workflow step by step.
- Encode your video to a 10bit or up intermediate format such as ProRes 422, ProRes 4444, ProRes HQ or DNX-HR HQX, DNX-HR 4444. DNX-HR HQ is only 8bit and therefore not suitable for HDR.
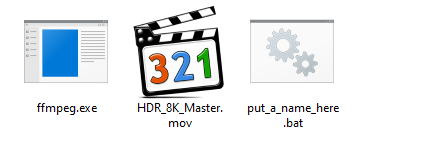
- Download a build of FFmpeg and place the ffmpeg.exe (in the bin folder of the zipped FFmpeg download) in the same folder as the previously rendered video. It should look like this:

- Open a text editor a type in the following line: ffmpeg -i HDR_8K_Master.mov -b:v 100M -pix_fmt yuv420p10le -color_primaries 9 -color_trc 16 -colorspace 9 -color_range 1 -profile:v 2 -vcodec libvpx-vp9 -c:a libopus -b:a 384k output.webm
With these words, you tell the ffmpeg.exe to start, open the file, set the right parameters, and render to a file. The first word “ffmpeg” starts the .exe in a windows terminal window. The part “-i HDR_8K_Master.mov” imports the video file when it is called HDR_8K_Master.mov. If not change the name in the FFmpeg text or change the file name.The part “-b:v 100M -pix_fmt yuv420p10le -color_primaries 9 -color_trc 16 -colorspace 9 -color_range 1 -profile:v 2 -vcodec libvpx-vp9 -c:a libopus -b:a 384k” defines the codec parameters.“-b:v 100M” means a bitrate of a 100mbit/s. When you change it to “-b:v 50M” the video will be having 50mbit/s. Easy!“-pix_fmt yuv420p10le” tells ffmpeg to convert the video to the YUV 10bit with 4:2:0 color subsampling pixel format. This is perfect for delivery.“-color_primaries 9” sets the color gamut to the bt.2020 standard
“-color_trc 16” sets the transfer curve to ST2084 PQ. If you choose HLG as the output format change the number to 18. This is particularly important because PQ and HLG are quite different and wrong metadata can lead to an unwanted result
“-color_trc 16” sets the matrix-coefficients to the bt.2020 space
“-color_range 1 -profile:v 2” these sets the right color range and profile
“-vcodec libvpx-vp9 -c:a libopus -b:a 384k” sets the video codec to vp9 and the audio codec to opus with 384kbit/s
“output.webm” define the output name. You can change the name to any name you want but “.webm” is important.
Settings as resolution, framerate, or sample rate are copied from the input video.
- Save the text document as a put_a_name_here.bat and copy it to the same folder as the video and ffmpeg.exe. This should look like this:

- When you double-click the .bat file a windows terminal window will show up. When all is configured correctly the conversion process starts. This could take a long time. After the terminal window closes a new .webm file should be in the folder. This is the vp9 encoded video that can be uploaded to YouTube.

As mentioned above, please check out my blog post about the AV1 encoding: HDR | YouTube AV1 upload The “new” AV1 Codec is in comparison much more efficient than VP9.
Sources
Technical Documentation – ACESCentral
ACES DaVinci Resolve Der Kelch des Pius HDR High Dynmaic Range HLG Metadata PQ YouTube